Showing posts with label project. Show all posts

Wednesday, August 31, 2016

Closet Makeover and DIY Custom Foam Core Board Tray Organizer


I'm eliminating clutter from our home using the KonMari method. I learned about it in the book, "The Life-changing Magic of Tidying Up" by Marie Kondo. It may sound cliche, but it really is life-changing.


Recently, my BFF and I ripped out all of the built-in shelving from my master closet. The spacing was impractical and they weren't adjustable. We got a little aggressive with the hammer, so last weekend  I patched, sanded and repainted the closet walls.


Emptying the closet
Shelves ripped out. Walls full of dents.


Walls patched and painted

Then, my husband hung ClosetMaid Shelftrack tracks, screwing them into the wall headers. The standards hang from the track. You can reconfigure  them as your needs change over time with no unsightly holes to patch. The SuperSlide brackets let you slide hangers continuously along the rod.


I have two armoires that I bought second hand. They are solid wood, Bassett pieces that I got for $150 total. No particle board or cardboard backing here. The style is a bit dated, but they provide dust-free storage.

Since my husband is 6' 2", I decided it would be more convenient for him to reach into an armoire than bend over to retrieve clothes from dresser drawers. So I decided to move the armoires into the closet.

Before I could move his clothes in, I needed a way to contain them on the  shelves. One of Marie's methods is to fold most clothing, rather than hanging it. And, by folding it so that each piece stands on its own, you can store more items in a smaller space. Standing the items up like fabric soldiers also means nothing is hidden from view.

I searched online for storage solutions that were both practical and affordable. When I found nothing, I turned to Pinterest for some DIY inspiration. Basically, what I needed was a really big organizer tray. So, I picked up a few supplies to add to what I already had on hand and got to work.


Supplies:
foam core board (I bought a tri-fold project board)
Elmers Glue All or other PVA glue
craft knife with a fresh blade
cutting mat
pencil (I used a chalk pencil on the black board)
straight edge
tape for trimming the edges


  1. Determine the measurements for your finished product then deduct 1/2 inch from the length and width to allow for the thickness of the foam core board. Cut a piece of foam core board to these dimensions. This will be the base.  
  2. Cut two pieces to the exact length of the short sides by 3" tall. 
  3. Add 1/2" to the measurement of the long sides and cut two pieces this length by 3" tall.

  4. Run a thin bead of glue along one short side and butt a short piece to it. Secure it in place with straight pins. Then do the same to the other short side.
  5. Add a long side, which should cover the raw edges of the short sides because you added the extra length. Secure with pins. Do the same to the other side.


  6. If you want to add dividers, measure inside the assembled tray and cut to fit. glue in place. If you want to add decorative fabric or paper to the inside base, do it before adding the dividers.


  7. Once the glue has dried a about 20 minutes or so, you can remove the pins and begin trimming with tape.
  8. Cut a strip of tape to length and center it over the raw edge of one end. Trim the ends of the tape as needed then smooth it down onto the board, making sure not to press too hard, which will leave indentations in the board.


  9. Do this for the top edges, the bottom edges, then the corners. Or you may want to do the corners first, it's up to you.


  10. Add additional decorative trim if you wish.
And this is how it looks in the armoire. Pretty cool, huh?


I used black board and black tape to keep it simple. I could add a wide ribbon trim to the front or decorative knobs, even. There are lots of different decorative tapes that you can use to make your tray fun and functional. You could cover the inside with decorative paper or leave the tape off and use spray adhesive to cover the entire tray with fabric.

Scale the tray down a bit and it becomes a drawer organizer. Scale it down even more, and it's a jewelry or make-up organizer. The uses are endless.

I hope you find this DIY helpful. Please leave comments and photos if you make one for yourself.
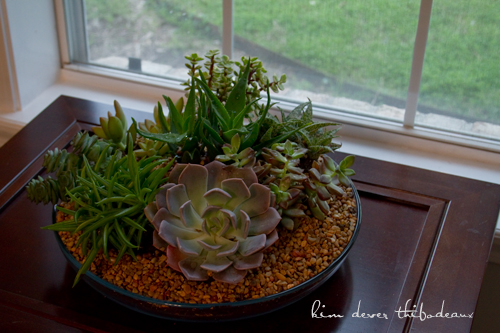
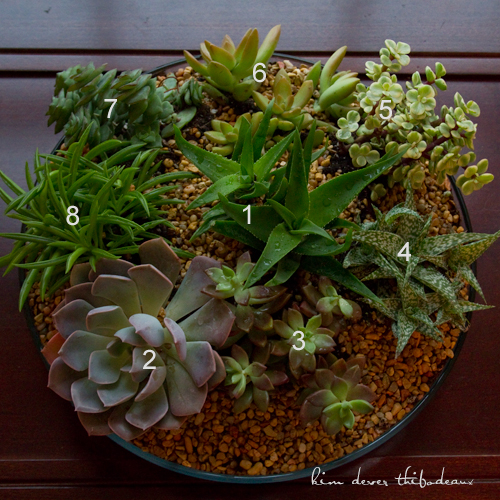
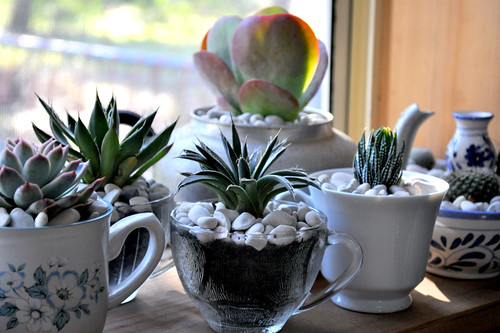


Saturday, February 18, 2012

Quick and Easy Project::A Succulent Table Garden

"It is a violation of federal law to use this product in a manner inconsistent with its labeling."

"Please Do Not Remove Label Under Penalty of Law"

When I read these warnings I get the urge to defy them. I want to mix chemicals just to see if they'll create poisonous gases or cause an explosion. I want to wander the aisles of a home textiles store and rip the tag off of every pillow. I've always been up for a challenge. I love defying the odds. I've never really set out to break the law, but I do think creatively. I visit a flea market, garage sale, or Goodwill store and my wheels spin into overdrive with the possibilities.

Recently, I decided that I wanted to plant a succulent dish garden. I've always appreciated the variety of textures and colors of these hardy, water-retaining plants that are cousins to cacti. Hmmm...water retaining...maybe I feel a kinship...Anyway, I decided to pick up a few little succulent gems at Home Depot. They had a modest selection and each plant cost a little under $4. But when it came to choosing a dish, I wasn't so lucky. I wasn't sure where my little garden would be placed so I wanted a neutral container...but I didn't want terra cotta. The other containers were too deep and they were plastic. Ewwww!!! I picked up a small bag of potting soil while I was there, which completed my purchases. Yes, I know, spending less than $50 at Home Depot sounds crazy, but I did it!

potted-succulents succulents dish garden climbing aloe graptoveria Debbie alpenglow vera higgins aloe pinto rainbow bush elephant bush golden sedum string of buttons peperomia My plant selection

I then headed next door to Walmart for a few groceries and decided to peruse the aisles for just the right dish. And lo and behold, I found it in the aisle with the party platters and serving trays. Anchor Hocking makes a 13", shallow glass dish, which they call a serving tray. It was just the right size. I know Anchor Hocking did not manufacture this dish with the intention of it being used as a table top garden. But I didn't see any warning labels on it telling me not to, so I went for it! I already had bags of aquarium gravel at home, so I made my way to the checkout lanes.

anchor-hocking-glass-dish aquarium-gravel

I often do things a little backwards, and this was no exception. After purchasing my plants, I did some Googling on how to plant them properly. I learned that I should have bought cactus mix potting soil or some pumice to add to my soil. Succulents don't like wet feet, so you need to draw moisture away from them rather than hold it close. Good drainage is key.

Sooo...Here's what I did. First I decided on how I wanted to arrange them in the dish. Then I poured a nice layer of gravel in my dish. Next, I poured a layer of potting soil. I removed each plant from its pot and positioned it in the soil. I sketched the arrangement on paper, numbered each plant, and noted the name by each. There's was no way I would remember what each one was. I wiggled each planting so that the roots were kind of in the gravel. I anchored the plants in place with more potting soil, then topped it with gravel to hide the soil. During the planting process, soil and gravel spilled into the leaves of the plants so I used an old paint brush to clean them off. I removed gravel from deep in the leaves using tweezers. I watered slightly and I was done.

Succulents only need to be watered about once a week, and sparingly at that. Watering in the morning is best. They like morning light, so I placed my dish in the window of my bedroom. My original intention was to bring the dish garden to work, but from everything I read I don't think they would thrive.

Here's my finished, succulent dish garden. I'm very happy with it.

succulents dish garden climbing aloe graptoveria Debbie alpenglow vera higgins aloe pinto rainbow bush elephant bush golden sedum string of buttons peperomia

Here's an overhead shot and plant identification. Some have very cute names.

succulents dish garden climbing aloe graptoveria Debbie alpenglow vera higgins aloe pinto rainbow bush elephant bush golden sedum string of buttons peperomia
1. Climbing Aloe - aloe ciliaris
2. Graptoveria 'Debbie'
3. 'Alpenglow' 'Vera Higgins' - Graptosedum
4. Aloe Pinto
5. Rainbow Bush or Elephant Bush - Portulacaria afra 'Variegata'
6. Golden Sedum - Sedum adolphii
7. String of Buttons - Crassula perforata
8. Peperomia - Peperomia ferreyrae

Succulents will grow in just about any kind of container, as long as they have good drainage. Here are some more clever ideas for growing your own.


A living succulent wreath for year-round color by Julie Martens. Project instructions from Better Homes & Gardens.

tea cup succulents
Do you enjoy hunting for tea cups at the flea market? You can use them to showcase succulents in a sunny window.


Barbara Jordan Dettweiler works succulents into her interior design in clever ways, like these vintage silver champagne glasses. You can read about it on her blog, Haus Design.


Succulent turtle topiary available from Simply Succulents


Do you prefer glowing rather than growing? Here are some beautiful succulent candles from Tavalu.com.


How about sewing instead of growing? This cushion's design was inspired by the Euchavaria succulent. It's by Ronel Jordaan and can be found on amagugu.com.

The simple elegance of succulents can be adapted to any decorating style and their drought tolerance means you don't have a green thumb to grow them. I'm sure you'll see them in future posts as I find new ways to work them into my own home.

Want to see more great projects that you can do yourself? Join me at the Addicted 2 Decorating Link Party every Friday afternoon!