Showing posts with label photography. Show all posts

Sunday, October 12, 2014

Product Photography Light Box Tutorial


Many artisans are selling their goods online. In fact, there is so much competition that you may find yourself spending as much time on your computer promoting your creations as you spend actually creating things.

Since buyers often rely on a computer screen or smartphone to do their shopping, it's important that your creations be visually represented as accurately as possible.

Many artisans rely on a digital camera or their smartphone for photographing their products. They often point and click. The result is often photos that are poorly lit, out of focus, or shot against a messy background, which is distracting and detracts from the beauty and the perceived value of the item.

Here are some common scenarios.
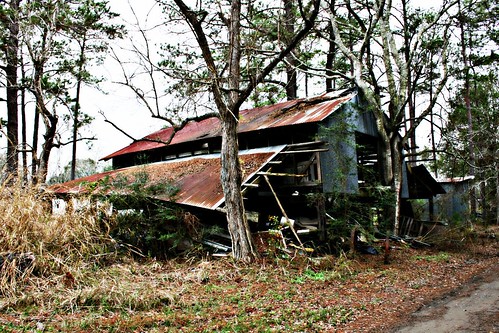
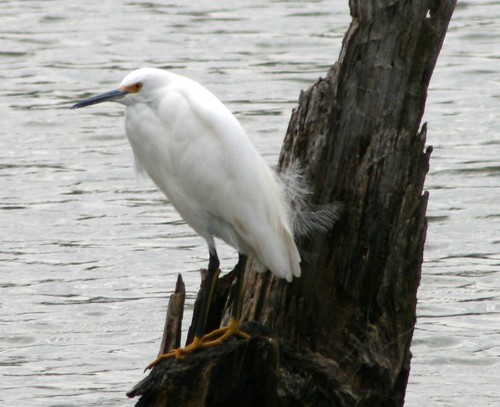
Flash causes overexposure in some areas and shadows in
others. Background is distracting. Product is too far away.
You can't appreciate the details.


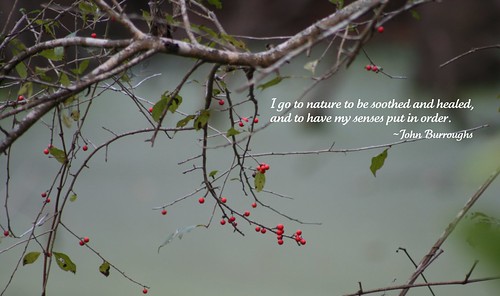
No flash. Scene is poorly lit causing a lot of "noise",
the little colored dots that cover the photo.
Product is out of focus.
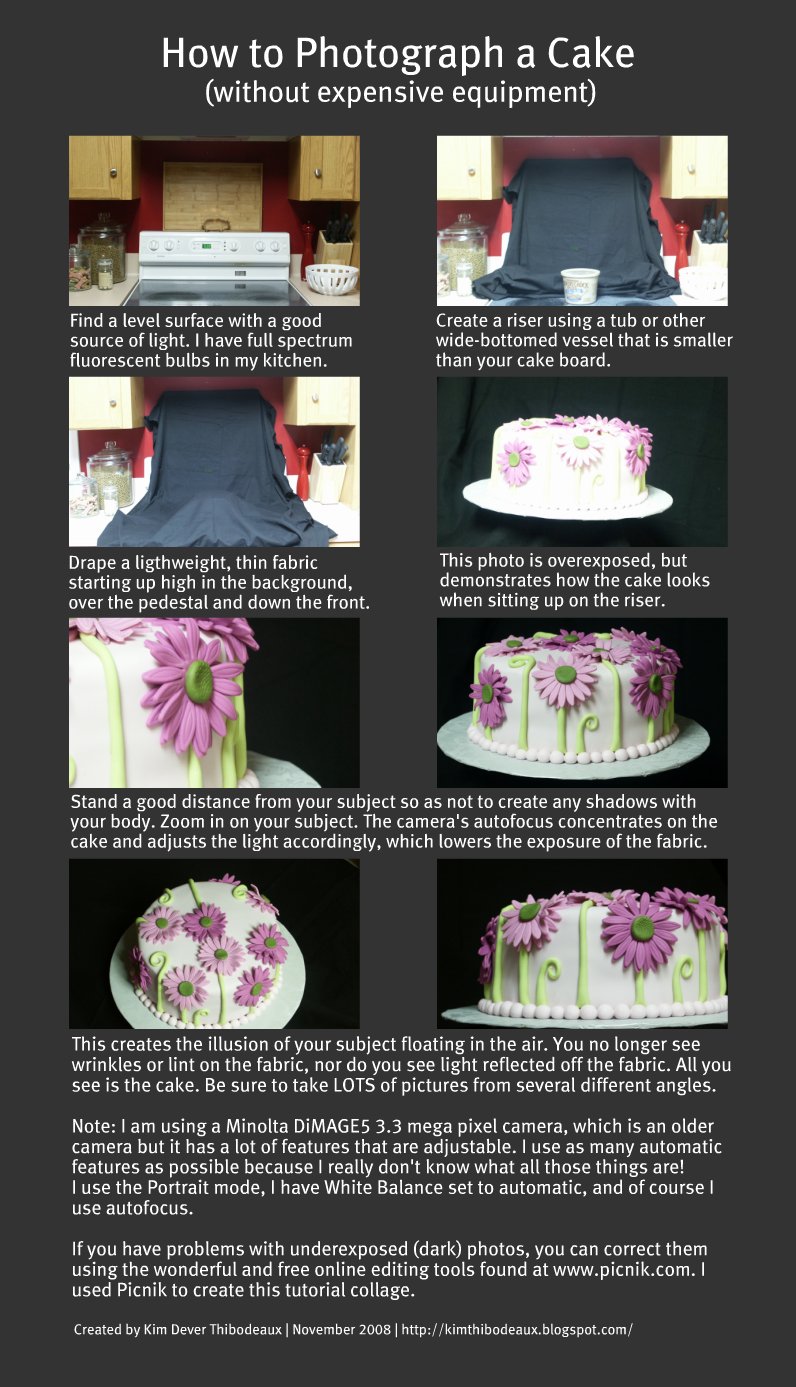
Here's a quick and easy way to improve your photos and give the attention to your creations that they deserve. And, hopefully, help you close more sales. This tutorial shows you how to build a quick and easy light box to photograph smaller items, but the same principles will apply to larger items. This works for both DSLRs, point and shoot cameras, and smart phones. I am not a professional photographer. I'm sure that even my photos could be improved upon. But, I think they are better than average and I like to share what I've learned with others.

List of Materials:
1 cardboard box big enough to fit your product with room to spare
2 sheets of tissue paper or parchment paper or any kind of thin white material that will diffuse light
2 really really bright lights. I prefer halogen shop lights.
1 white poster board
1 box cutter or serrated steak knife or anything that will cut the cardboard
tape

  1. Decide which side of the box is going to become the "floor".
  2. Remove the flaps from the other three sides. 
  3. Cut large openings in the other three sides.
  4. Use tape and tissue paper to cover the openings.
  5. Lay the box down so that the uncut side is now the "floor" and its flap extends the floor.
  6. Place a white poster board in the box so that it curves up the back "wall" from the floor. This creates the "infinity edge" that is so desirable in product photography.
  7. Position a bright light on either side of the box so that it shines through the diffusing material (tissue paper, etc.) If you don't have shop lights, take the shades off of a couple of lamps and move them close to the diffusers. Just remember, the whiter the light, the better. 
  8. If available, shine another bright light through the top panel.
  9. Place your object on the floor and position it to your liking.


Now you're ready to make photographs.

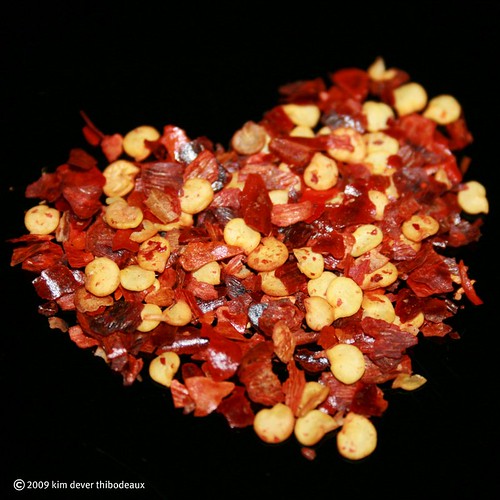
Depending on what type of camera you are using, you may need to make a few adjustments. For this photo, I used my Samsung Galaxy Note 2 smart phone. I selected the "macro" focus mode setting and set the white balance to "incandescent" light to remove the yellow tint.


Don't be afraid to experiment. Take a photo. Make adjustments. Take another photo. Make adjustments. Adjust the different settings until you are happy with your pictures.

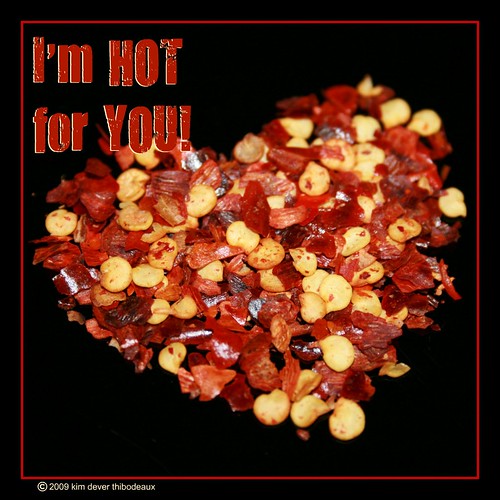
Now that you have your photos, you can use them as is or use software or a phone app to further enhance them. You'll probably always need to crop your photo into a pleasing composition, then,  perhaps adjust the white balance further and increase the saturation, if necessary. Basically, you should adjust the photo until you think it accurately represents your product to potential buyers.

For this image, I brought my photo in Adobe Lightroom for the basic adjustments then I brought it into Adobe Photoshop CS4 to add the banner and text. Again, a lot of this can also be done using phone apps.


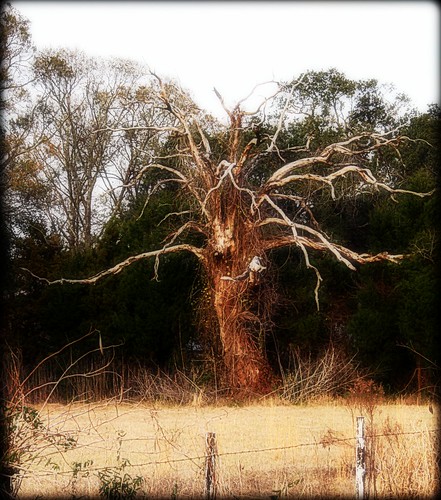
Now, as I mentioned earlier, some items may be too large for a box, but the same principles apply. Use a light or non-distracting background and shine diffused light on your object from every angle to reduce shadows. If shooting outdoors, choose a bright overcast day. The clouds are nature's diffuser!

I hope you've found this quick and dirty tutorial helpful Feel free to ask questions and I'll do my best to answer. And there are no dumb questions. And if you have some tried and true methods that work for you, feel free to speak up. We're all learning here.

kim


Tuesday, February 24, 2009

Mist-ical Mardi Gras Morning

Lake Martin Sunrise

View Large On Black

It's February 24, 2009, Mardi Gras. No work. No school. I awaken early, dress in the dark, grab my gear and dash out of the house headed for the lake - careful not to wake my sleeping husband and children. I thrilled to learn that it's 37° outside. If I'm right, the water in Lake Martin is warmer than the air and a nice steamy mist will be rising from the surface.

As I drive away, the sun is just appearing over the horizon. It's burning bright on the winter morning. I've never driven to the lake in the early morning, so I am excited at the prospect of what I will find.

I arrive at the lake and out of my side window I immediately notice a blue heron standing still as a statue in the water, waiting for breakfast to swim into view. Then, I notice the mist. Just has I suspected, its dreamy tendrils are rising from the lake. I am giddy with anticipation. Within minutes, the golden sun breaks through the trees and beams of light streak across the lake, illuminating the mist.

From where I am standing, a tree-lined peninsula separates the lake so that the water on the other side of it glows like an ethereal cauldron. I carefully compose my photos and fire away, knowing that something wonderful awaits on my memory card.

The air is soon filled with the noises of lake activities. The cries of birds beginning their day. The rumbling of boat engines starting up and racing off to find that perfect fishing spot. I continue to shoot on foot, then I return to my car and tour the lake road, enjoying the morning as it unfolds.

I have witnessed the birth of another beautiful day in South Louisiana.

Monday, February 23, 2009

Louisiana has some of the best sunsets on Earth.

This is another beautiful Louisiana sunset as it unfolded tonight at Lake Martin.

5:51 p.m.
Glow - 5:51 p.m.

6:02 p.m.
Glow - 6:02 p.m.

6:09 p.m.
Glow - 6:09 p.m.

6:12 p.m.
Glow - 6:12 p.m.

Sunday, February 22, 2009

Still Standing

My Grandpa's Barn
My grandfather's barn. December 2008, Sulphur, Louisiana.

I've always enjoyed photos of old structures that have fallen into extreme disrepair, but still exhibit the character and workmanship that are rare in today's modern world. Here in South Louisiana, cypress was the lumber of choice because it resistant to insects and rot. Because of its durability, you can find many old structures that have stood the test of time...and hurricanes.

Now that I'm exploring the world of photography I have learned that old, abandoned structures in rural areas are often referred as "rural decay", especially if you visit the Flickr photo-sharing website. (If the structure is located in a city or metropolitan area, it is referred to as "urban decay").

Here are my recent contributions to the rural decay photography populous.

Thursday, February 12, 2009

Fire Crackers

Fire Crackers! So addictive they should be called CRACK Crackers!

These are so addictive they should be called CRACK Crackers! They are wonderful served with cream cheese and pepper jelly, or with soup or chili. They are so good and flavorful that they make a great snack that can be eaten alone.

Recipe:

4 sleeves of saltines
1 packet Hidden Valley Original Ranch Dressing mix
1 or 2 tablespoons red pepper flakes
1 teaspoon garlic powder
1/2 teaspoon onion powder
1 cup vegetable oil

Combine all dry ingredients in a bowl with oil and whisk together.

Put crackers in a 2 gallon resealable bag. Drizzle oil & seasoning mixture over the crackers. Seal bag. Gently toss crackers so that they become coated with mixture. Lay bag flat and let it sit for 10 minutes. Then toss crackers around some more and lay the bag on the opposite side for another 10 minutes.

Remove crackers from bag and place in an airtight container such as a large glass or plastic canister with a tight-fitting lid.

Soup's On!

Wednesday, February 11, 2009

Feeling Hot! Hot! Hot!

Feeling Hot! Hot! Hot!

Having fun trying out some macro photography. Although according to some purists, this isn't a true macro shot. Just a really close, close-up.

Anyway, since Valentine's Day was right around the corner, I placed a heart-shaped cookie cutter on a black tray. Sprinkled some red pepper flakes in the cutter, then gently removed the cutter. Took some close up shots using my camera's macro setting. And this is what I got.

Valentine's Sentiment

Thursday, January 29, 2009

No, We're Not in Kansas

Dorothy and Toto must be close by
For me, some things beg to be photographed. Like this tree.

It was late afternoon and my daughters and I were headed to Lake Martin to take a few pics before the sun went down. Late afternoon is my favorite time of day because of the beautiful glow that the sun casts on everything as it makes its way down to the horizon.

As we drove by a field that we have driven by numerous times, I noticed this tree. Perhaps it stood out because it is apparently dead, as opposed to those trees around it. All I know is that it seemed to reach out to me, like those trees that come to life in the Wizard of Oz. So I pulled off the highway as much as possible, turned on the safety flashers, and got out of the car. I took what photos I could without getting run over by oncoming traffic. My adventure was cut short when the puppy that lived across the highway decided to come after me. I was afraid he would enter the highway and get hit by a car, so I got him home safely, got back into the car and headed for the lake.

I've processed the photo a bit to give the tree the prominence it deserves. Judging by the vines that cover it, it may be host to wisteria or trumpet vines in the Spring. I'll definitely be visiting it again.

Saturday, January 17, 2009

Fish gotta swim, birds gotta fly...

Snowy Egret on a Blustery Winter's Day

Fish gotta swim, birds gotta fly,
I gotta love one man 'til I die,
So I can't help lovin' dat man of mine.

Excerpt from the song "Can't Help Lovin' Dat Man" by Jerome Kearn; lyrics by Oscar Hammerstein, from the 1927 musical Show Boat!.
___________________________________________________________

When visiting Lake Martin and surrounding areas, it's apparent that Mother Nature is always busy at work, even during the winter months. There's always something to be seen at the lake. Even on the coldest of days, fish gotta swim and birds gotta fly.

Here are some my favorite photographs taken during January, 2009.

Saturday, January 10, 2009

Self-Portraits

Learning to use a new camera can be daunting. I've found that the person who is the most patient and willing to sit still while I fidget with different settings is....me!

I also enjoy experimenting with Picnik's post-processing techniques. So I shot a few pics of myself in the mirror and had some fun.

Thursday, January 1, 2009

January One With Nature

A good start to the new year.

January 1, 2009. The first day of the new year. I decided to spend it being one with nature.

I arrived at Lake Martin at around 1:00. Since it's a new year, I wanted to try something new - see the lake on foot. So I parked my car at the boat launch and headed down the road, traveling counterclockwise around the lake.

For those of you not familiar with the lake, you should know that you can drive around part of the lake, but much of the lake is off limits to motorized vehicles. But you can walk around the entire lake since it is surrounded by a levee, topped by a footpath. I walked it in a little under four hours. You can probably walk it in much less time if you walk fast and don't stop to enjoy the wildlife along the way.

At first, it was quite sunny. Saw a few turtles out sunning. Of course there were great white herons and anhingas out and about, as well as lots of beautiful cardinals and tiny, little yellow bellied birds that suffer from severe ADHD so I couldn't get any pics. A terrific flock of wood ducks was surveying the scene before landing in the lake not far from me. Saw a little blue heron at a distance. Oh, and a green-headed mallard took flight. Wish I had seen him before he took off.

Met up with a few people along the way, including someone I worked with about 10 years ago. Visited a bit with a friend who actually lives on Rookery Road. The day became overcast around 3:00 so by the time I reached the area where I usually see gators, there were none to be found. And, unfortunately, no pretty sunset to speak of.

I have to say that this was one of the most relaxing and enjoyable days that I've had in my life. Sometimes it's good to be alone.

Happy New Year!


Map of the Lake

Sunday, December 28, 2008

Santa brought me a new camera!

Berries & Spiderweb
My previous camera, a Minolta DiMAGE 5, decided to retire. It made a few sputtering noises, then a loud *POP*, then it emitted the telltale aroma of burnt electronics. It still takes pictures, but the flash no longer works. And, every once in a while that lovely burnt smell accompanies a shot or two.

So, I shopped around, consulted photography friends, and decided I wanted a Canon 400D, also known as the Canon Digital Rebel XTi. I found a really great deal and placed it in my husband's Amazon.com shopping cart. I told him this just in case he decided to surprise me with a new camera for Christmas. He said he would like to but Christmas shopping had taken its toll on our funds, so it probably wasn't going to happen.

But then, lo and behold, he came through! He picked me up from work and told me about it on the way home. I cried, which kind of freaked him out because I don't usually cry...at all. I told him I was crying because there were other things that we could have spent the money on and we didn't need a camera. But on the other hand, I really enjoy my photography and I needed a camera for Christmas pictures of the kids. Then we had a good laugh.

He had it expedited so that it would arrive on Friday, December 19th. UPS, however, had other plans. They decided it should take a detour first so it went to Jeanerette, then back to the Lake Charles hub before finally arriving in New Iberia and put on a truck for delivery.

I met the truck at the road. The driver and his co-pilot are not regulars to our neighborhood, and I think my waving and jumping up and down kind of scared them. I rushed to the door on the passenger side and he looked a little apprehensive. But, nonetheless, he verified my address and handed my package over to me.

I took pictures the night it was delivered and of course I brought it to work with me the next day and took pics of my coworkers. It worked perfectly for Christmas Eve and Christmas morning shots. I took a ride out to Lake Martin the day after Christmas to test my new zoom lens. It was overcast and windy, but it was 77 degrees outside, so there was wildlife to be found. I was quite pleased with the pics I got considering that I really hadn't had time to acquaint myself with all the features and settings. I also got some good shots when we went to visit my grandfather in Sulphur, Louisiana.

Here are some of my favorite shots that I've taken so far.

Friday, November 21, 2008

How to Photograph a Cake (without expensive equipment)

While I always enjoy compliments on my cakes and cookies, I've recently begun to get many compliments on may cake and cookie photography. Being a practical and frugal person (interpreted as "cheap"), I'm always looking for creative solutions.

After completing my most recent cake, I decided to try something new when it came time to photograph it. I recently installed full spectrum bulbs in the fluorescent ceiling fixture in my kitchen, which has improved my ability to shoot without a flash. Throw in an empty butter tub and a $2.00 scrap of fabric and voila, I've got some really nice photos. Read more about my Fuchsia Gerbera Daisy Cake.